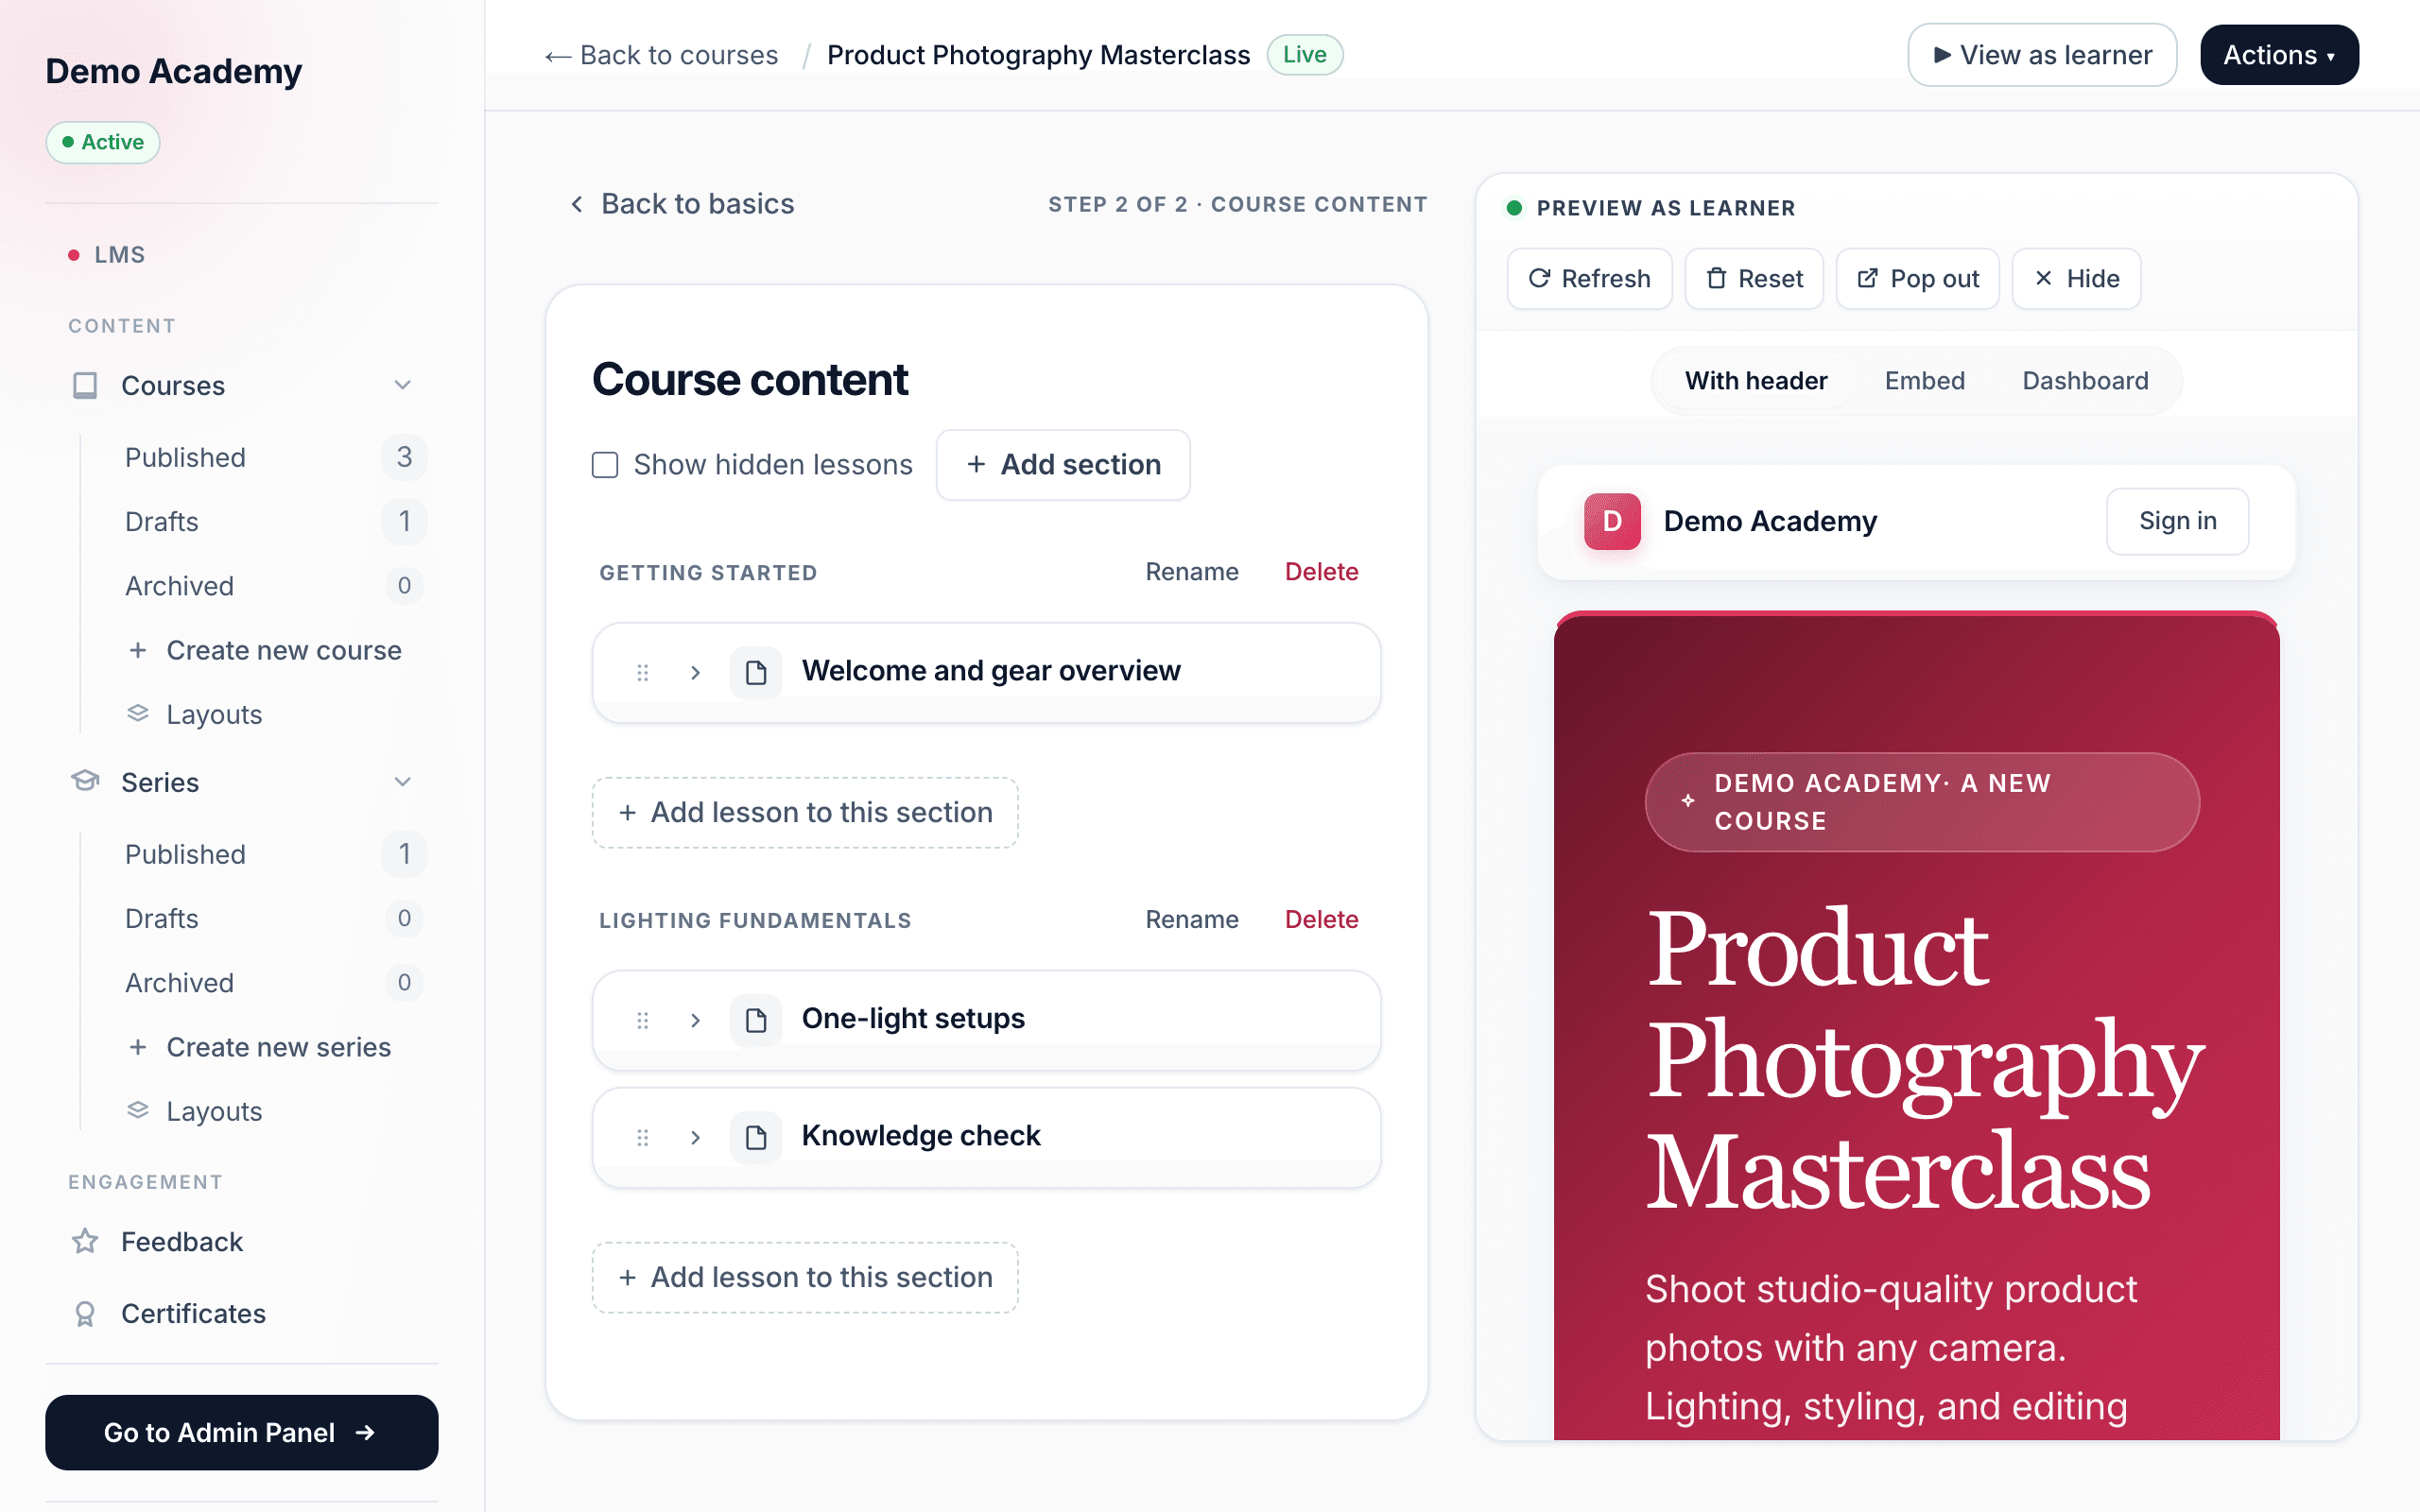
Once your course basics are saved, click Next: course content to open the content builder. The header reads Step 2 of 2 · Course content, with a Back to basics link if you need to jump back. Everything a learner actually works through lives here, organized in three nested levels:
- Sections group the course into chapters or modules. They’re purely organizational — they don’t lock or gate anything.
- Lessons sit inside a section. A lesson is the unit you can schedule, gate, and mark required — it’s where all the pacing controls live.
- Activities are the content blocks inside a lesson — a video, some text, a quiz, and so on. Each activity is what a learner marks (or auto-completes) as done.
The left half of the screen is the builder. The right half is a live Preview as learner pane that refreshes as you edit — more on that at the end.
Sections
Click Add section, type a title, and press Enter (Escape cancels an empty one). Sections keep a long course readable — “Getting started,” “Core skills,” “Wrap-up” — but they have no effect on progression. You can rename a section inline, and drag lessons freely between sections; an empty section shows a dashed Drop a lesson here target.
Lessons
Inside a section, click Add lesson to this section and give it a title. Each lesson row shows small status pills so you can read the whole course at a glance:
- Optional — the lesson isn’t marked required.
- Scheduled (clock icon) — a drip-release date or delay is set.
- Prereq (lock icon) — the lesson is locked until another lesson is finished.
To take a lesson out of circulation without deleting it, use Hide (archive). Hidden lessons disappear for learners but stay in your builder behind a Show archived toggle, with a Restore action to bring them back.
Lesson settings
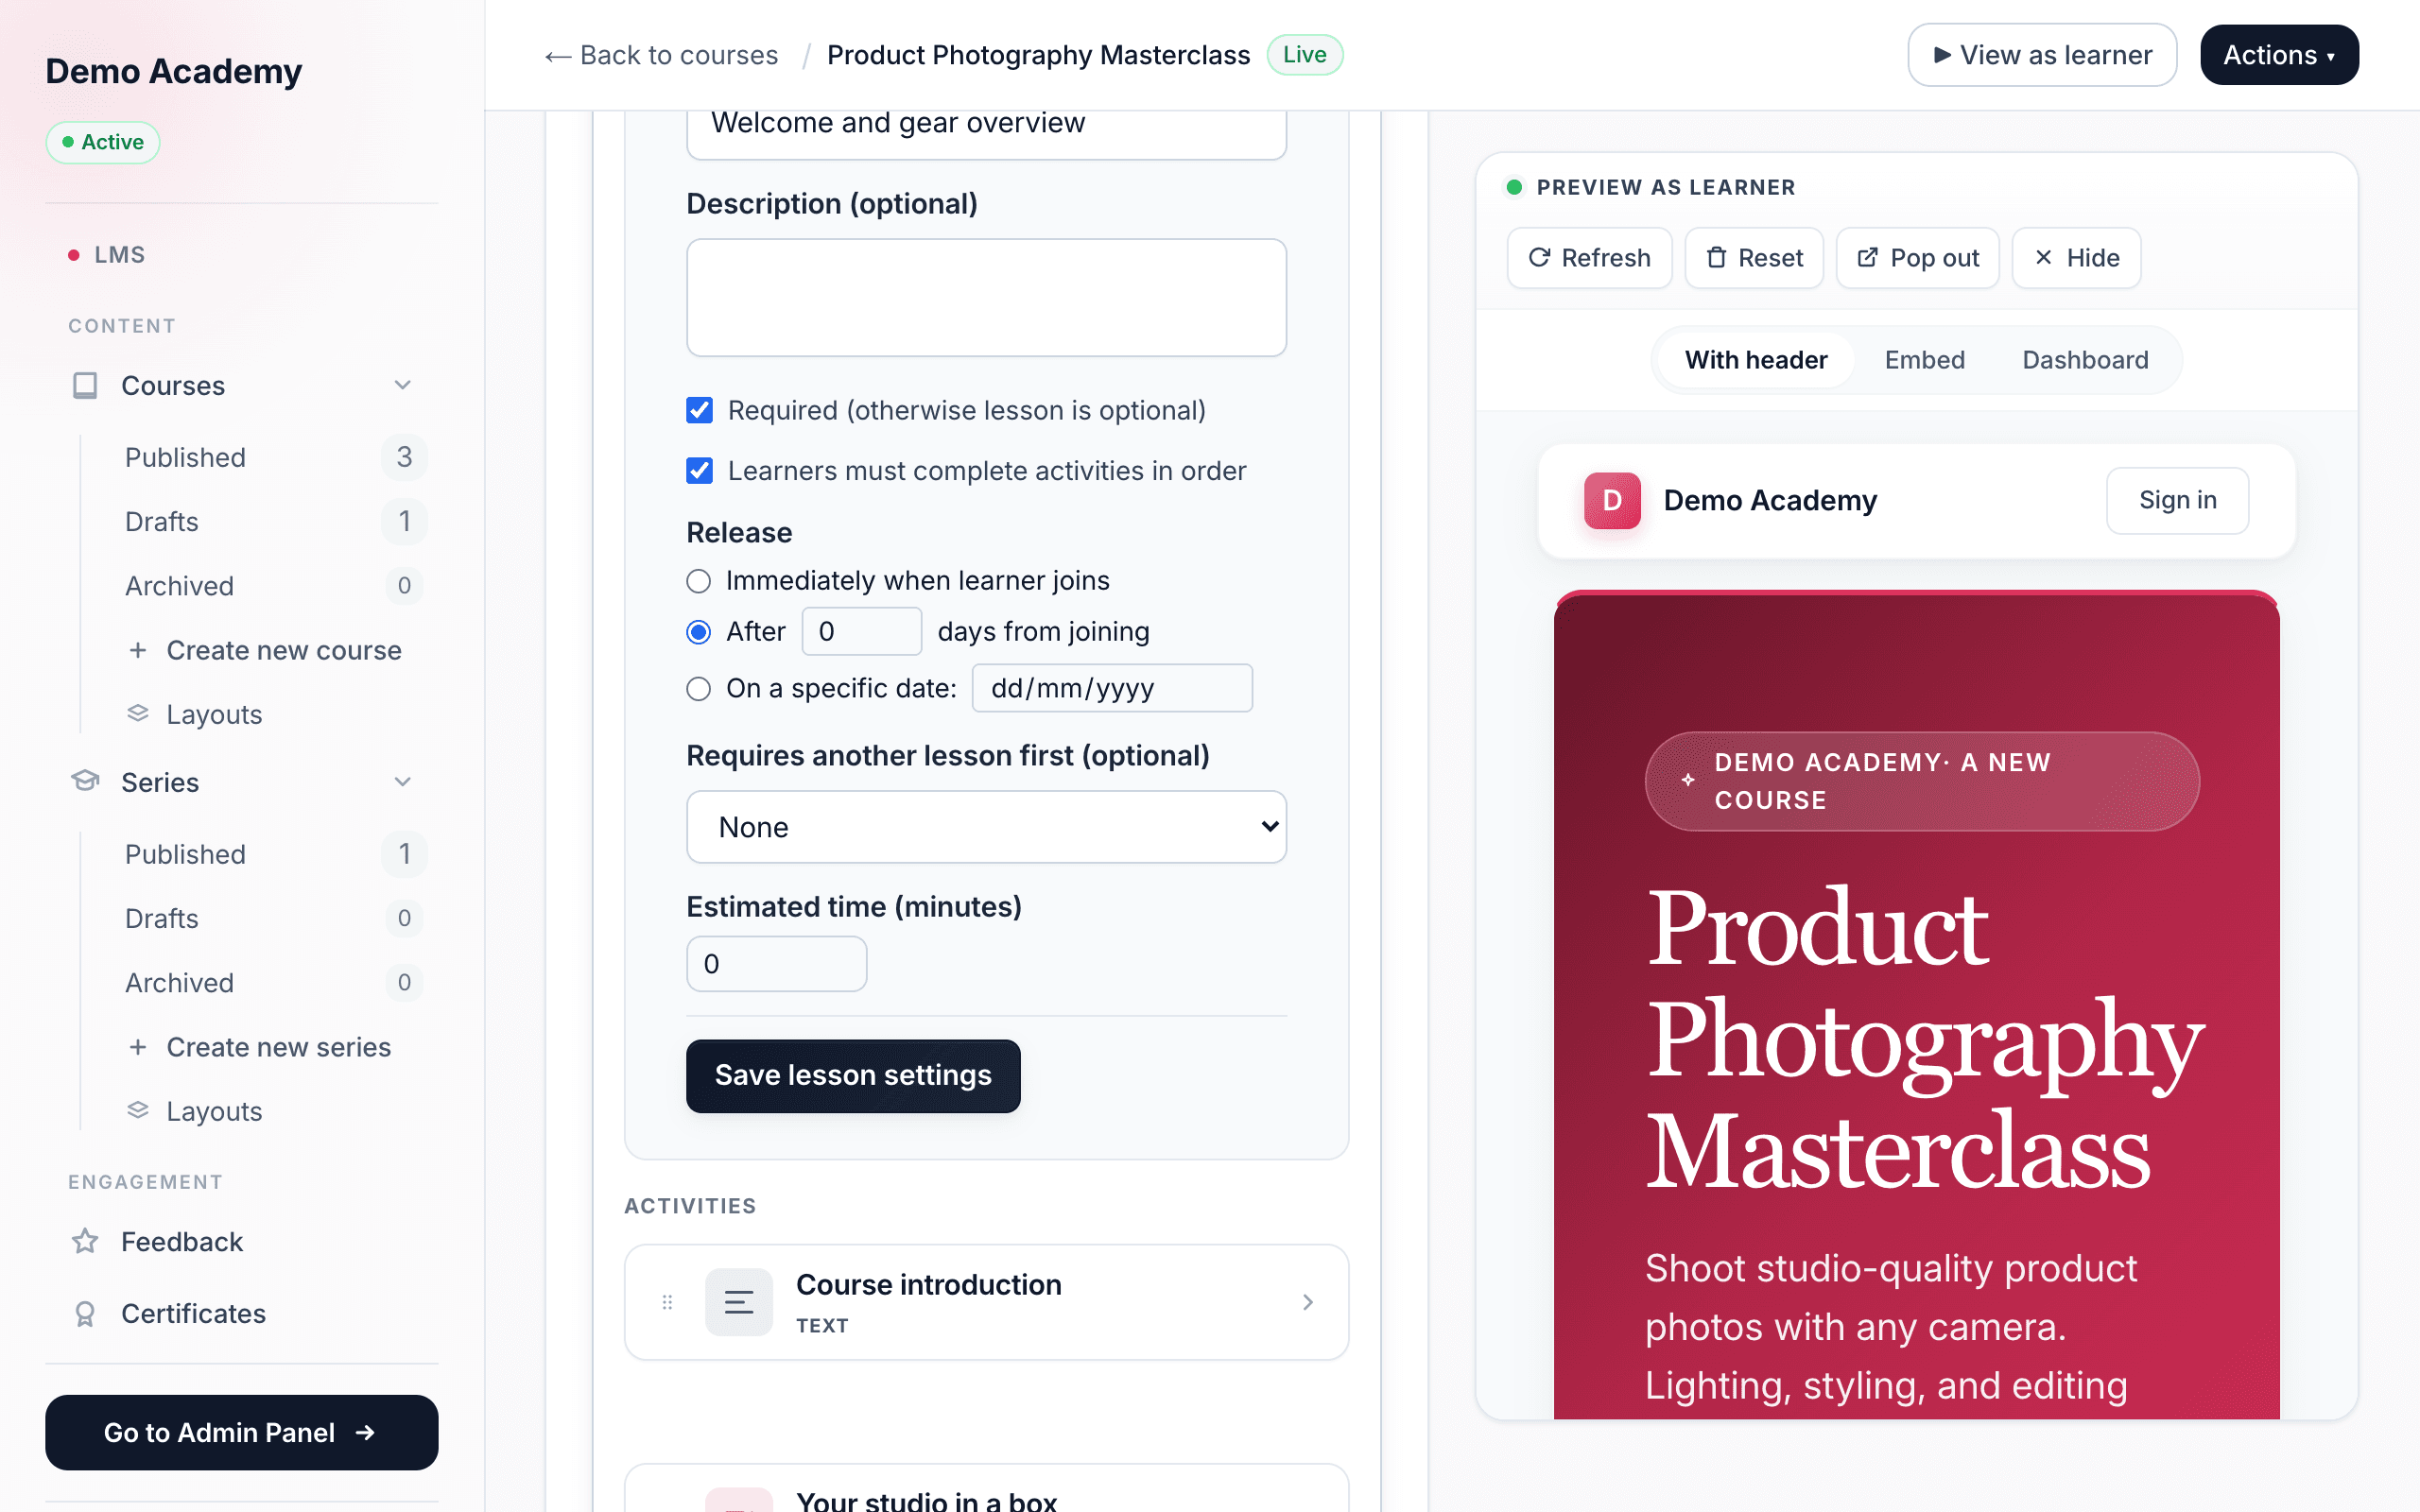
Open a lesson’s Settings panel to control how and when it’s delivered. Unlike activity content (which autosaves), the settings panel saves with an explicit Save lesson settings button — you’ll see a Saved confirmation once it goes through. The fields:
- Title — up to 200 characters; can’t be empty.
- Description (optional) — a short summary of the lesson.
- Required (otherwise lesson is optional) — a checkbox that sets the Optional badge when off. See the note below on what “optional” means today.
- Learners must complete activities in order — the force-sequence switch, on by default. When on, each activity in the lesson stays locked until the one before it is complete. Turn it off to open every activity in the lesson at once (good for reference material learners jump around in).
- Requires another lesson first (optional) — a dropdown of None plus every other lesson. Pick one and this lesson stays locked until that lesson is complete. Learn 360 blocks impossible setups: a lesson can’t require itself, can’t point at a different course, and can’t create a loop (A needs B, B needs A).
- Estimated time (minutes) — a display-only number that helps learners judge the workload. It doesn’t affect gating or completion.
Release — the three drip options
The Release radio group decides when a lesson unlocks. The three choices are mutually exclusive — picking one clears the others:
- Immediately when learner joins — open from the moment someone enrolls. The default.
- After N days from joining — locked until N days after each learner’s own enrollment date. Perfect for evergreen “week 1, week 2” pacing where everyone starts on their own clock.
- On a specific date — locked until one fixed calendar date, the same for everyone. Ideal for a cohort that all opens Module 3 on, say, January 8.
On the lesson row, the builder summarizes this in plain English — “Releases 3 days after a learner joins,” “Releases on Jan 8, 2026,” or “Immediately.” When a lesson is still locked, learners see the reason and the time it becomes available. If a lesson has both a drip date and a prerequisite, the drip is shown first.
Activities
Open a lesson and click Add activity to drop in a content block. Every activity — whatever its type — shares the same controls:
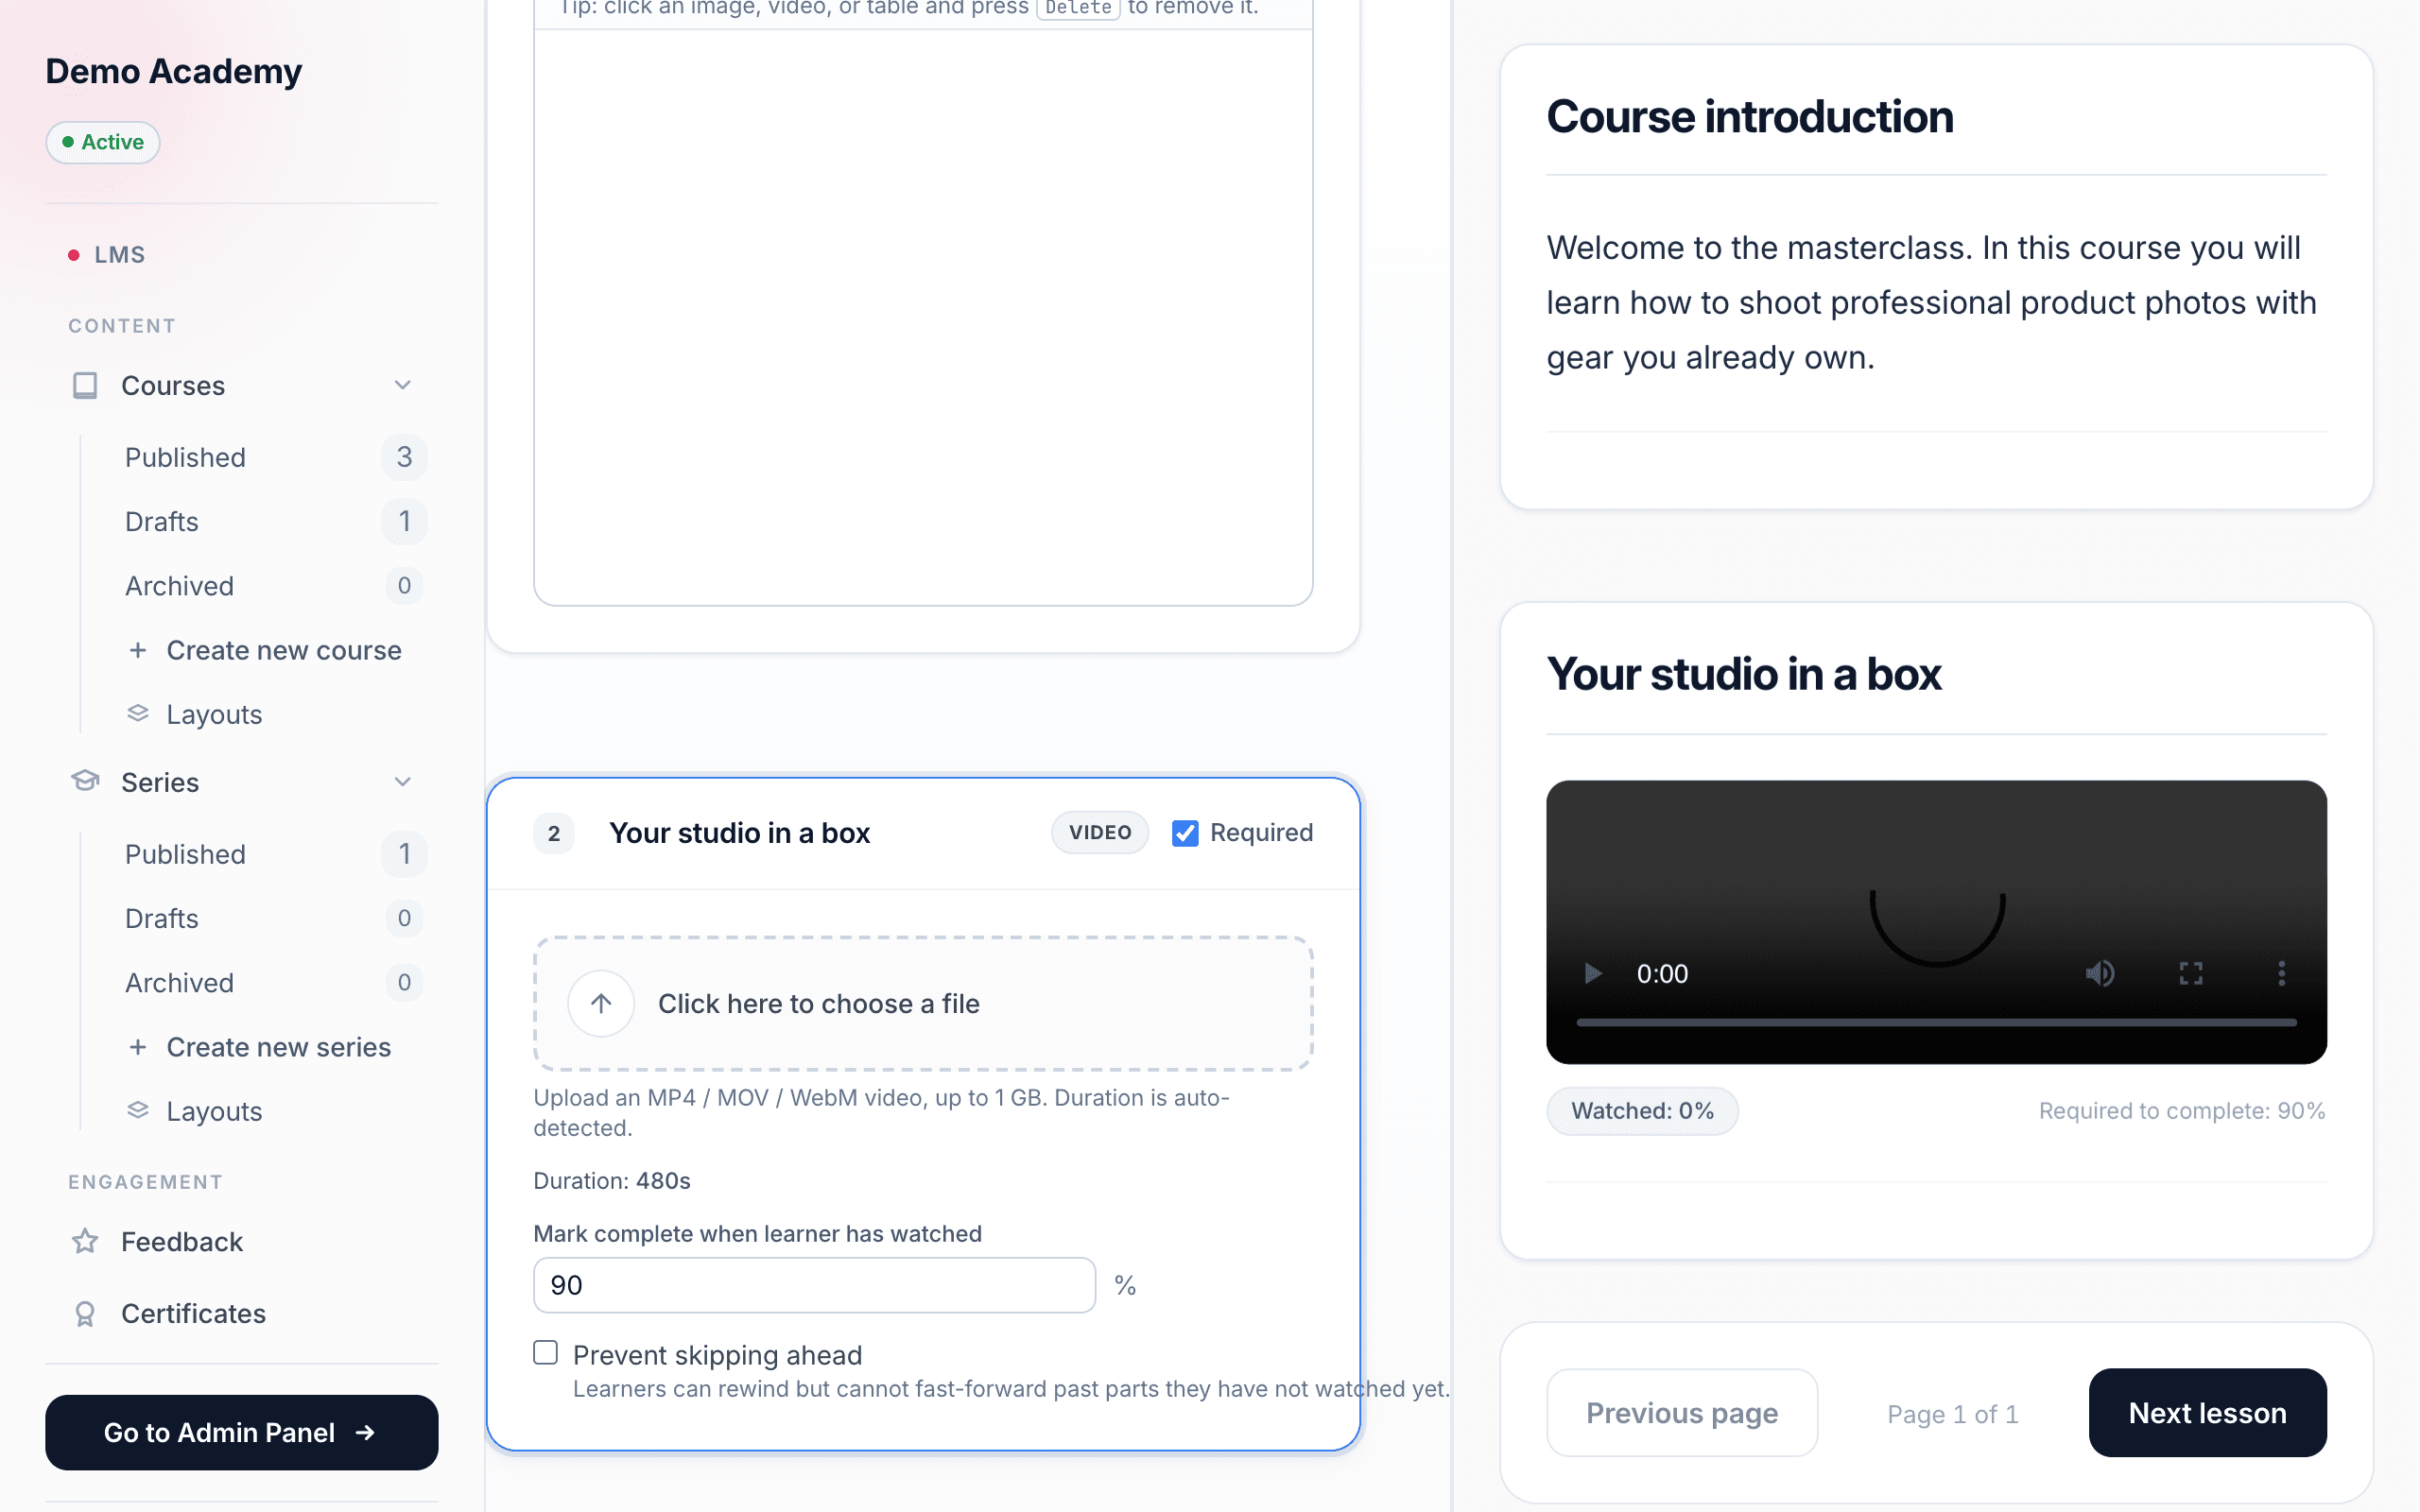
- Title — inline editable, saves on blur. New activities start named Untitled [type] until you rename them.
- Required — a checkbox; when off the card shows an Optional badge (same caveat as lessons above).
- Delete activity — removes it after a confirm.
Unlike lesson settings, activity content autosaves as you type — you’ll see a Saved tick. You can drag activities to reorder them within a lesson, and even drag one into a different lesson.
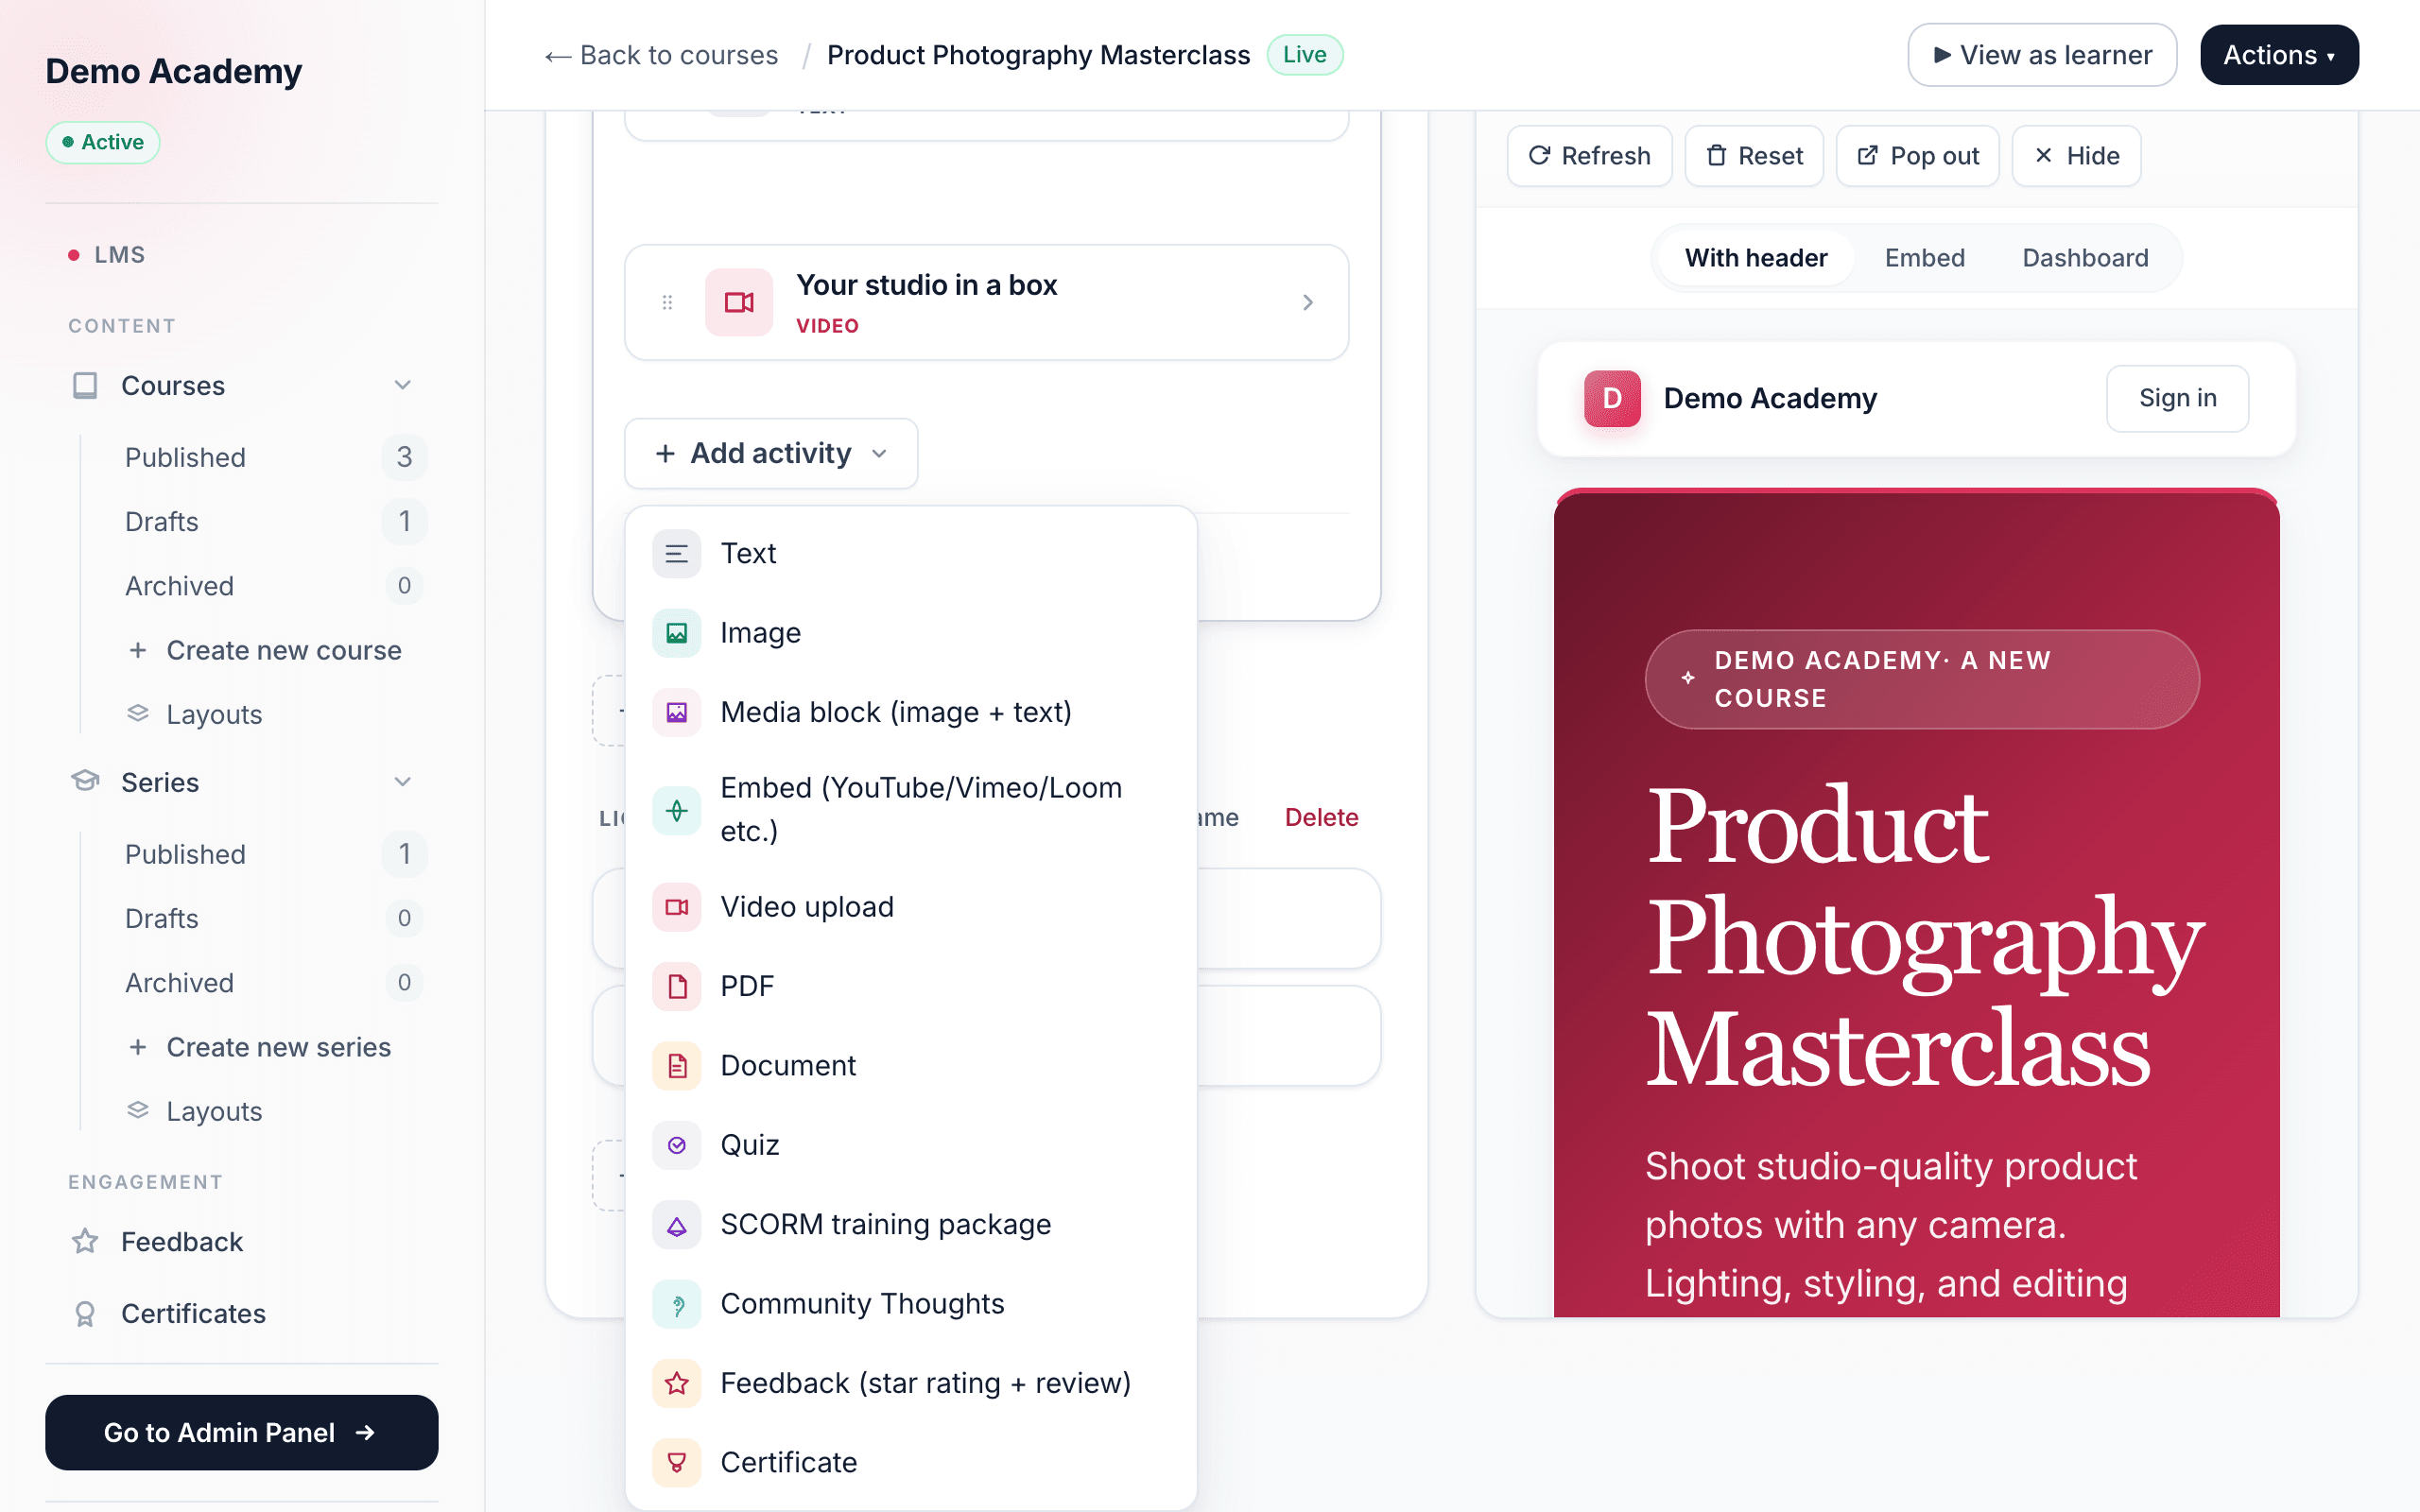
The Add activity menu
The Add activity dropdown lists every block type you can add. Each is covered in detail below:
- Text — formatted notes and instructions.
- Image — a single picture with an optional caption.
- Media block (image + text) — a picture or video sitting beside body text.
- Embed (YouTube / Vimeo / Loom etc.) — content hosted on another platform.
- Video upload — your own video file with watch-tracking.
- PDF — a document read inside the lesson.
- Document — a file learners download to view.
- Quiz — graded questions (its own guide: Quizzes & assessments).
- SCORM training package — a standards-based e-learning package.
- Community Thoughts — a shared prompt where learners post responses.
- Feedback (star rating + review) — collects course reviews (covered in its own section below).
- Certificate — issues a certificate when the learner reaches it.
Page breaks
By default, all the activities in a lesson stack onto one scrolling page. Hover between any two activities and click Add page break to split them — the builder inserts a divider labelled Page N starts here, and everything between two breaks becomes one learner “page.” Use breaks to pace a longer lesson into steps: watch a video, click through, then take a quiz.
Every activity type & how it’s marked complete
Completion matters because a lesson only finishes when its activities are done, and a course only finishes when its lessons are. Each type has its own rule — some are marked done manually, others auto-complete when the learner has watched, scrolled, or passed enough.
Text
A block of writing. You author it in Markdown and can set an estimated read time (minutes). It autosaves as you type. Marked complete when the learner clicks the mark-complete button — there’s no way to auto-detect reading.
Image
A single image (JPG, PNG, WebP, GIF, or SVG, up to 25 MB) with an optional caption. Marked complete manually.
Media block (image + text)
A picture or short video paired with rich body text. You choose a layout (image left, right, top, or bottom), a media type (image or video), and a source (upload a file or paste a URL); side-by-side layouts let you drag an image-width handle from 10% to 100%. Marked complete manually.
Embed (YouTube / Vimeo / Loom etc.)
Pulls in content hosted elsewhere. Paste an Embed URL (Learn 360 auto-cleans YouTube, Vimeo, and pasted <iframe> code) and pick a type label. Optionally set Auto-complete after N seconds. Marked complete: if you leave the timer blank, it completes when the learner opens it; if you set a timer, it completes once they’ve had it open that long.
Video upload
Your own video (MP4, MOV, or WebM, up to 1 GB — duration is detected automatically). Two completion controls: Mark complete when learner has watched __% (default 90) and Prevent skipping ahead (learners can rewind but can’t fast-forward past parts they haven’t reached). Marked complete once watched time crosses your percentage; progress only ever moves forward, so skipping around doesn’t inflate it.
A document read inside the lesson — learners can’t download it. Page count is detected automatically, and you set Mark complete when learner has scrolled __% of pages (default 80). Marked complete once the farthest page they’ve reached crosses that percentage.
Document
A downloadable file (Word, plain text, RTF, and similar) — the counterpart to PDF when you want learners to save a copy. Marked complete manually, after they open or download it.
Quiz
Graded questions that check understanding. You set a pass score, optional retake limit and time limit, and build multiple-choice, true/false, or short-answer questions. Marked complete when any attempt scores at or above your pass score. Because there’s a lot to it, quizzes have their own guide: Quizzes & assessments.
SCORM training package
Upload a SCORM 1.2 or 2004 .zip authored in another tool (Storyline, Rise, Captivate, etc.). Learn 360 detects the version and plays it inline. You choose the completion criteria — how the package’s own signals count as done:
- When SCORM reports completion (or pass)
- Only when SCORM reports a pass
- When SCORM reports completion or pass
- Only when SCORM reports both completion and pass
Marked complete when the package reports back the status your chosen criteria require. Make sure your authoring tool actually fires a completion (or pass) trigger, or the activity can never finish.
Community Thoughts
A shared prompt where learners post a response and see each other’s. It needs one field — the Intro text learners read — and takes over its own full page (the course discussion tab is hidden while a learner is on it). Marked complete once the learner posts at least one message.
It’s a two-way thread, not a one-way form: learners don’t just post, they answer each other. Each top-level post is a question or thought, and replies underneath it are the answers (one level of nesting — no replies to replies). When you or another company admin reply, your answer carries an Official badge so learners can tell an authoritative response from a peer’s.
These posts are moderated with the same controls as a course discussion thread — you can pin, hide, or delete any post, and a hidden post vanishes for learners while staying visible to you. For the full set of moderation tools, see Moderate discussions & community.
Legacy: Discussion (deprecated)
Older courses may still contain a standalone Discussion activity. It has been superseded by the course-wide discussion thread (a toggle on the course basics page) working alongside Community Thoughts, so it’s no longer offered in the Add activity menu. An existing Discussion activity still works and can be edited or deleted, but you can’t create a new one — the builder points you to Community Thoughts or the course thread instead.
Feedback (star rating + review)
Collects a star rating and a written review from each learner. Marked complete the moment the learner submits (one submission per learner). This one doubles as your review-collection engine, so it gets its own section next.
Certificate
Issues a certificate to the learner when they reach it. You pick a design (your tenant default or a named design), an optional expiry in days (blank = never expires), and a signer name and title. Like Community Thoughts, it sits alone on its own page. Effect: reaching the activity automatically issues the certificate. For the bigger picture — designs, the course-completion certificate, and where learners find theirs — see Award certificates.
Feedback = your course reviews
The Feedback activity is how Learn 360 gathers the reviews that appear on your course’s public landing page. It’s worth setting up deliberately.
What learners see
You author three things (the last one is optional):
- Star rating question — defaults to “How would you rate this course?” (a 1–5 star scale).
- Written feedback question — defaults to “What did you think? What stood out?” (required for the learner, up to 4,000 characters).
- Add a yes/no question — an optional extra like “Would you recommend this to a colleague?”
There’s also a Show feedback anonymously switch: when on, published reviews display as Verified learner instead of the person’s name.
Moderation — you decide what goes public
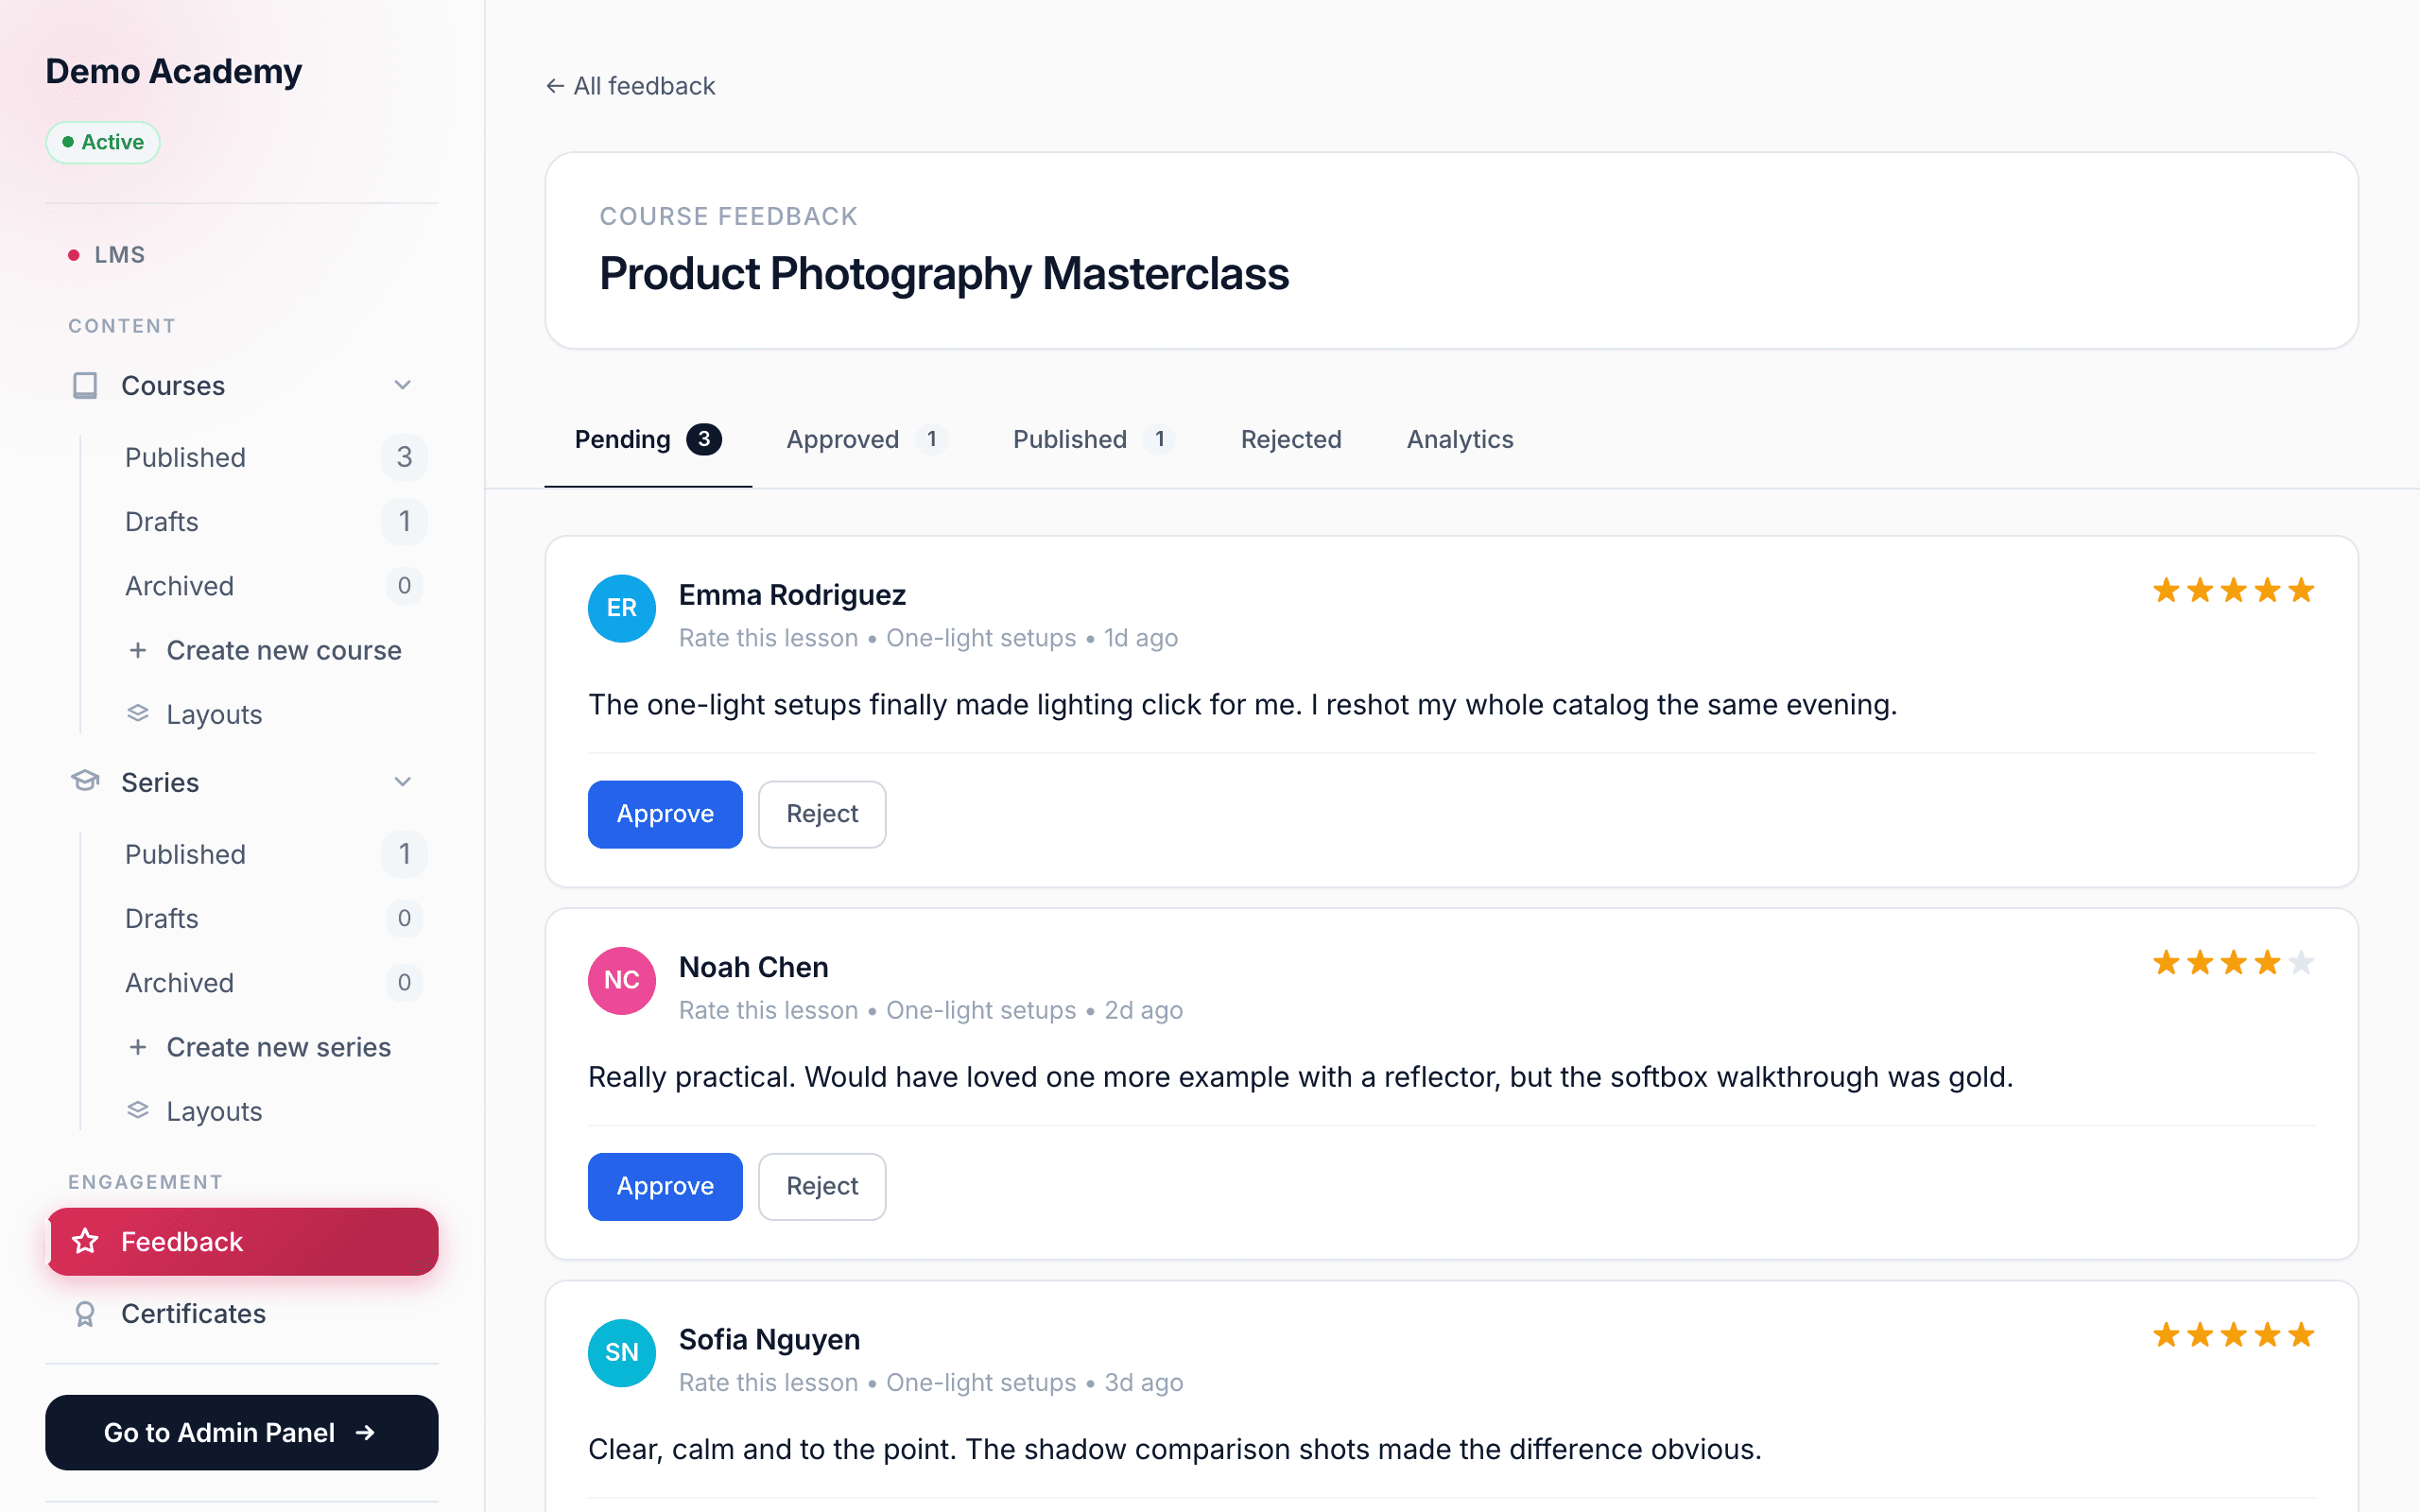
Nothing a learner submits appears publicly on its own. Moderation has its own home: open LMS → Feedback (in the sidebar’s Engagement group) to see every course that’s collecting reviews, each with a count of what’s awaiting review versus live publicly. Click a course to open its dashboard — with Pending / Approved / Published / Rejected / Analytics tabs — where every submission lands in Pending and you act on each one:
- Approve a pending review to move it to Approved.
- Reject one you don’t want.
- Publish an approved review to put it on the public page.
- Unpublish to pull a published review back to approved.
The Analytics tab
The dashboard’s Analytics tab turns submissions into numbers: the average rating, the total number of responses, the percentage who answered “yes” to your yes/no question (your would-recommend rate, when you’ve added one), the full star distribution from one to five stars, and — for a course with more than one Feedback activity — a per-activity breakdown of count and average stars. Every figure here counts approved and published submissions only, never pending or rejected ones, so the averages reflect the reviews you’ve actually vetted.
Where reviews show up
Only published reviews appear on the public course (and series) landing page, in its Reviews section, and only published reviews feed the star rating shown there. Your private feedback analytics — average stars, the star distribution, and the percentage who answered “yes” — count both approved and published submissions, never pending or rejected ones. Anonymous submissions always show as Verified learner.
Reorder, move & preview
Everything in the builder is drag-and-drop: reorder sections, drag lessons between sections, and reorder activities within a lesson or drag them into another lesson. As you work, the Preview as learner pane on the right shows exactly what a learner sees. Its controls let you Refresh the preview with your latest saved content, Reset the simulated progress, Pop out to a full tab, or Hide the pane — and a toggle switches between the With header, Embed, and Dashboard views. For the full walkthrough, see Preview as a learner.
Next steps
With your lessons and activities in place, tighten the graded parts with Quizzes & assessments and certificates, then publish your course to make it live.